
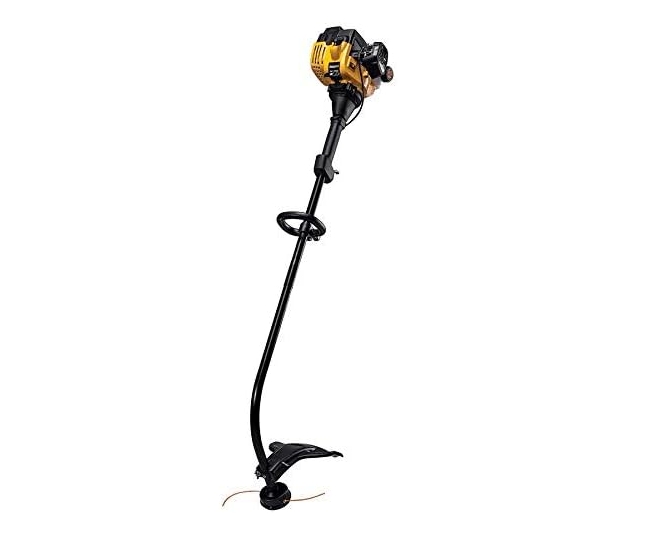
BOLEN BL110 2-Cycle Trimmer
- Curved Shaft
- Bump Head Line Release
- Spring Assisted Pull Cord for Easier Starting
- Adjustable D-Handle
- 16″ Cutting Swath
- Oil Included
$114.00
Having spent the past four years transforming my unruly suburban jungle into something resembling an actual landscape, I’ve learned that choosing the right trimmer can make or break your lawn care experience. When I first purchased my Bolens trimmer, I had no idea what I was doing. I just knew I needed something to tackle the areas my mower couldn’t reach. Several seasons (and many mistakes) later, I’m sharing everything I’ve learned about these workhorses of the yard maintenance world.
The Bolens Trimmer Revelation
My journey with Bolens began out of necessity. The edge of my property had transformed into what my neighbors politely called a “natural border” (translation: an embarrassing mess of overgrown grass and weeds). After my ancient hand-me-down trimmer finally died mid-job, leaving half my yard looking like it had received a partial haircut, I knew it was time for an upgrade.
What follows is everything I wish someone had told me about Bolens trimmers before I started down this path. From features to maintenance, troubleshooting to comparisons with other brands—consider this your comprehensive field guide from someone who’s battled every lawn care challenge imaginable.
Demystifying Bolens Trimmer Features
When I first started researching trimmers, the technical specifications looked like they were written in another language. What exactly makes a Bolens trimmer stand out from the crowd? After years of hands-on experience, I can break it down for you.
Engine Power and Design
Bolens trimmers typically come equipped with 2-cycle engines ranging from 25cc to 32cc. My first model was a modest 25cc, which I quickly learned was sufficient for my quarter-acre lot with typical suburban grass challenges. For those with thicker undergrowth or larger properties, the 29cc or 32cc models provide that extra punch needed to power through tougher vegetation.
The engines are designed with a focus on weight distribution—something I never thought about until I spent two hours trimming and felt like my arms might fall off. The curved shaft models position the weight closer to your body, making them more comfortable for extended use but slightly less versatile in tight spaces. Straight shaft models, while slightly heavier at the end, offer better reach under shrubs and along fence lines.
Cutting Width and Capability
One of the most practical features of my Bolens trimmer is its cutting width. Most models offer between 16-18 inches of cutting width, which strikes a nice balance between efficiency and precision. The first time I used it, I was surprised at how quickly I could work through areas that would have taken forever with my old 14-inch trimmer.
The cutting head on Bolens trimmers uses a bump-feed system, which initially confused me. I kept smacking the ground aggressively until a neighbor took pity and showed me the proper technique—a gentle tap on a hard surface while the trimmer is running releases more line. It’s one of those things that feels awkward at first but becomes second nature after a few uses.
Handle Design and Ergonomics
Perhaps the most underrated aspect of any trimmer is how it feels in your hands after 30+ minutes of use. Bolens models feature an adjustable loop handle with a soft grip that can be positioned based on your height and comfort needs. After trimming with a friend’s budget model that had fixed, hard plastic handles, I gained a new appreciation for this feature on my Bolens.
Most models also include a shoulder strap attachment point—a feature I initially dismissed as unnecessary until the first hot summer day when my arms were trembling halfway through the job. Now, the shoulder strap is non-negotiable for me.
Noise and Vibration Levels
While all gas trimmers make noise, Bolens models operate at around 96-98 decibels—louder than electric models but typical for gas-powered equipment. The vibration dampening on newer models is notably improved compared to older generations. I still wear ear protection during use, but I’ve found I experience less hand fatigue with my Bolens compared to other brands I’ve tried.
Starting Your Bolens Trimmer: From Frustration to First Pull Success
My relationship with my Bolens trimmer got off to a rocky start—literally. The first time I tried to start it, I pulled the cord so many times I thought my shoulder might dislocate. After consulting the manual (yes, I was that desperate), I learned the proper starting procedure that has served me well ever since.
The Proper Starting Sequence
Here’s my foolproof method for starting a Bolens trimmer that works nearly every time:
- Place the trimmer on a flat surface
- Move the on/off switch to the “on” position
- If the engine is cold, set the choke to the full choke position
- Press the primer bulb 5-7 times until fuel is visible
- Hold the trimmer firmly with one hand
- Pull the starter cord with a smooth, steady motion (not a jerky pull)
- After the engine attempts to start, move the choke to half position
- Pull again until the engine starts
- Allow the engine to warm up for 30-60 seconds
- Move the choke to the run position before trimming
The key insight I gained is that patience during the starting process saves time and frustration in the long run. Flooding the engine by over-priming or pulling too many times with the choke on creates a much bigger headache. If you smell fuel but the engine won’t start, you’ve likely flooded it and need to wait 10-15 minutes before trying again with the choke off.
Starting Troubles and Solutions
When my trimmer refuses to start on the first few pulls, I go through a mental checklist:
- Is there fresh fuel in the tank?
- Is the spark plug wire connected?
- Is the air filter clean?
- Is the spark arrestor screen clear?
- Have I been storing the trimmer with fuel for months?
Nine times out of ten, the issue is fuel-related. Which brings me to my next hard-learned lesson…
Fuel Facts: What Your Bolens Trimmer Really Needs
Perhaps the biggest mistake I made early on was being casual about fuel. I’d grab whatever gas can was in the garage and top off the trimmer without much thought. After an expensive repair and a stern lecture from my small engine mechanic, I now treat fuel selection with the reverence it deserves.
The Perfect Fuel Mixture
Bolens trimmers use a 40:1 gas-to-oil ratio for their 2-cycle engines, which translates to 3.2 ounces of 2-cycle engine oil per gallon of gasoline. When I first heard this, I thought, “Close enough is good enough, right?” Wrong. My careless approach to measurement led to poor performance, excessive smoke, and eventually, engine damage.
I now use premixed fuel for convenience and consistency. Yes, it costs more per gallon, but considering the repair bills and headaches it prevents, it’s actually saved me money in the long run. If you prefer to mix your own, invest in a proper measuring container and use fresh, high-quality oil specifically designed for 2-cycle engines.
Fuel Freshness Matters
Gas begins to degrade within 30 days, and ethanol-blended fuels (which are most common now) can absorb moisture from the air, leading to poor performance and potential damage. I learned this the hard way after leaving fuel in my trimmer over winter, only to find it wouldn’t start come spring.
Now I follow a strict protocol: I never use fuel older than 30 days in my trimmer, and I either run the tank dry before storage or add a fuel stabilizer if I’ll be storing it for more than a month. This simple habit has dramatically improved my starting success rate and overall engine performance.
Ethanol Concerns
Most standard pump gas contains up to 10% ethanol (E10), which can cause problems in small engines. Ethanol attracts water and can degrade rubber and plastic components over time. While Bolens trimmers are designed to handle E10 fuels, I’ve found that using ethanol-free gas (available at some stations and outdoor equipment dealers) results in better performance and fewer maintenance issues.
If ethanol-free isn’t available, I make sure to use the highest octane regular unleaded I can find and never let it sit in the tank for extended periods.
The Art of Restringing: From Tangled Mess to Perfect Feed
The first time I needed to replace the line on my Bolens trimmer, I created what can only be described as a plastic spaghetti disaster. The line was tangled, the spool was backward, and I nearly threw the whole thing in the trash out of frustration. Several YouTube videos and practice sessions later, I’ve mastered the process.
Choosing the Right Line
Bolens trimmers typically use .080″ to .095″ diameter line, depending on the model. My 25cc uses .080″ line, which works well for regular grass and light weeds. When I tried to use heavier .095″ line thinking it would last longer, I discovered it actually strained the engine and reduced cutting efficiency.
Round line is the standard and works well for most applications, but I’ve found that twisted or square-shaped line cuts tougher weeds more effectively and tends to break less frequently. The downside is it’s slightly more expensive and can use more engine power.
Step-by-Step Restringing Process
Here’s my method for restringing a Bolens trimmer with minimal frustration:
- Turn off the engine and disconnect the spark plug wire for safety
- Press in the tabs on the trimmer head and remove the cover
- Remove the spool from the housing
- Clean out any dirt or grass debris from the housing
- Cut approximately 15-20 feet of new line
- Find the midpoint of the line and hook it into the notch in the center divider of the spool
- Wind each half of the line in the direction of the arrows on the spool (usually counterclockwise)
- Keep the line tight and orderly as you wind
- Leave about 6 inches of line extending from each side
- Feed the ends through the eyelets in the trimmer head
- Place the spool back into the housing
- Replace the cover, making sure it snaps securely into place
The biggest tip I can offer is to wind the line neatly and without overlapping. Overlapped line is the number one cause of feeding problems and jams. I also lightly spray the wound spool with silicone spray, which helps it feed more smoothly.
Troubleshooting Line Feed Issues
If your line isn’t feeding properly when you bump the head, check for these common issues:
- Line welded together from heat (remove and restring)
- Line wound too tightly (loosen slightly)
- Line wound in the wrong direction (check arrows on spool)
- Eyelets clogged with debris (clean thoroughly)
- Feed mechanism worn or damaged (may need replacement)
After much trial and error, I’ve found that preventative maintenance of the trimmer head saves more time than any other single practice. Cleaning the head after each use and inspecting for wear prevents most feeding problems before they start.
Maximizing Cutting Width for Efficiency
The cutting width of most Bolens trimmers ranges from 16 to 18 inches, which is determined by the length of line extending from the head and the guard size. When I first started using my trimmer, I didn’t realize I could adjust this within a certain range for different applications.
Adjusting for Different Tasks
For general trimming around the yard, I use the full cutting width to maximize efficiency. However, when I’m working in tighter spaces like between plantings or along delicate garden borders, I’ll temporarily shorten the line to give myself more precise control.
Some models allow you to adjust the guard position slightly, effectively changing the cutting swath. I’ve found that a wider setting works well for open areas, while a narrower setting provides better visibility for detailed work.
The Width-Power Relationship
One thing I learned through experience is that wider isn’t always better. Using the maximum cutting width requires more power from the engine and can bog down in thicker grass. If I’m tackling an area that hasn’t been maintained in a while, I’ll often make a first pass with a slightly narrower width, then go back to full width for the final trim.
This approach not only prevents the engine from straining but also extends the life of your trimmer line. Nothing wastes line faster than trying to take on too much thick grass at once with a wide cutting swath.
Troubleshooting a Stubborn Starter
Few things are more frustrating than planning to knock out your yard work quickly only to spend half an hour trying to start your trimmer. After numerous episodes of starter rope-pulling rage, I’ve developed a systematic approach to diagnosing starting problems.
Fuel System Issues
The most common starting problems with my Bolens trimmer have been fuel-related:
- Old or contaminated fuel: If the gas has been sitting for more than a month, drain it and refill with fresh fuel
- Improper mixing ratio: Too much oil can foul the spark plug; too little can cause engine damage
- Clogged fuel filter: Replace annually or when starting becomes difficult
- Fuel line problems: Check for cracks, hardening, or disconnection
- Carburetor issues: Sometimes a simple cleaning solves the problem; other times adjustment or rebuilding is needed
I now make it a habit to drain my fuel tank at the end of each season and run the engine until it stops. This prevents old fuel from gunking up the carburetor during storage.
Ignition System Troubleshooting
If fuel isn’t the issue, the ignition system is the next place to look:
- Spark plug: Check for fouling, carbon buildup, or incorrect gap
- Ignition coil: May need testing if the spark plug is good but there’s still no spark
- Stop switch: Ensure it’s in the “run” position (sounds obvious, but I’ve made this mistake more than once)
- Wiring connections: Look for breaks or loose connections
I replace my spark plug at the beginning of each season as preventative maintenance, which has eliminated many starting issues before they begin.
Compression Problems
If both fuel and ignition check out, compression might be the culprit:
- Air filter clogged: Restricts airflow needed for combustion
- Exhaust port blocked: Carbon buildup can prevent proper exhaust flow
- Cylinder scoring: Usually indicates more serious engine problems
- Worn piston rings or cylinder: Results in low compression and difficult starting
Regular maintenance has prevented most compression issues for me, but when my trimmer reached the five-year mark, a compression test revealed it was time for more serious attention.
Long-Term Maintenance: Keeping Your Bolens Trimmer Running for Years
After my initial experience of treating my trimmer as a “use it and forget it” tool, I’ve developed a maintenance schedule that has dramatically extended its lifespan and reliability.
Routine Maintenance Schedule
My maintenance routine now includes:
After Each Use:
- Clean debris from the cutting head and cooling fins
- Inspect for loose parts or damage
- Check fuel level if planning to use soon
- Store in a clean, dry location
Monthly:
- Clean or replace air filter
- Check spark plug
- Inspect fuel lines
- Lubricate gearbox if applicable
- Clean the spark arrestor screen
Seasonally (Spring and Fall):
- Replace spark plug
- Replace fuel filter
- Thoroughly clean carburetor
- Check and adjust valve clearance if applicable
- Sharpen or replace cutting blades/attachments
Before Winter Storage:
- Drain fuel completely or add stabilizer
- Remove spark plug and add a small amount of oil to cylinder
- Clean entire unit thoroughly
- Store in a dry, protected area
This might seem like overkill, but the 30 minutes I spend on monthly maintenance has saved me countless hours of troubleshooting and repair time.
Critical Maintenance Areas
The areas that seem most critical for preventing problems are:
- Air filter: A clogged air filter reduces power and efficiency dramatically. I check mine monthly and clean or replace it as needed.
- Fuel system: Keeping the fuel fresh and the lines/filter clean prevents most starting issues.
- Cutting head: Regular cleaning prevents grass buildup that can jam the line feed or overheat the trimmer.
- Cooling system: Ensuring the cooling fins are clear of debris prevents overheating that can damage the engine.
When I neglect any of these areas, problems inevitably follow within a few weeks.
Understanding the Bolens Price Range: Value for Money?
When I was shopping for my first Bolens trimmer, the price range seemed reasonable compared to other brands—typically ranging from $100 for basic models to $200+ for higher-powered versions with added features. But is the price justified by the quality and performance?
Entry-Level Models ($100-$150)
The basic Bolens trimmers in this range typically feature:
- 25cc 2-cycle engines
- 16-inch cutting width
- Curved shaft design
- Basic bump-feed head
- Limited attachments capability
For my suburban quarter-acre lot, this level proved perfectly adequate for the first two years. The value proposition was solid for light to medium duty trimming tasks around a typical yard.
Mid-Range Models ($150-$200)
Stepping up to this range gets you:
- 27-29cc engines with more power
- 17-inch cutting width
- Straight shaft options for better reach
- Improved bump-feed mechanism
- Better vibration dampening
- Some attachment capabilities
After my entry-level model started showing signs of strain with thicker brush, I upgraded to a mid-range model and found the performance difference justified the additional cost.
Premium Models ($200+)
At the top of the Bolens line, you’ll find:
- 30-32cc engines
- 18-inch cutting width
- Professional-grade features
- Multiple attachment compatibility
- Enhanced comfort features
- Heavier-duty construction
For homeowners with larger properties or tougher vegetation challenges, these models offer the durability and power needed for consistent performance. While I haven’t personally needed this level, I’ve used a friend’s premium model and could definitely feel the difference in build quality and cutting power.
Value Calculation
When assessing the value of a Bolens trimmer, I consider:
- Expected lifespan (typically 5-7 years with proper maintenance)
- Cost per year of ownership
- Performance for my specific needs
- Availability of parts and service
- Warranty coverage
By this calculation, my mid-range Bolens has proven to be an excellent value, costing roughly $30-40 per year of service when amortized over its lifespan—less than hiring a lawn service for even a single cutting.
Where to Buy: Finding the Best Deal on Bolens Trimmers
When I was ready to purchase my Bolens trimmer, I spent considerable time researching where to buy. Each purchasing channel has distinct advantages and disadvantages worth considering.
Big Box Home Improvement Stores
Retailers like Home Depot, Lowe’s, and Menards regularly carry Bolens trimmers. The advantages include:
- Immediate availability (walk in and take it home)
- Opportunity to physically examine the product
- Frequent sales and promotions
- Relatively easy return process if needed
The downsides I’ve experienced include limited stock of accessories and replacement parts, and staff who may not be particularly knowledgeable about the specific features and maintenance requirements.
Local Outdoor Power Equipment Dealers
Small, independent dealers often provide:
- Expert advice from staff who specialize in power equipment
- Better after-sale support and service
- More complete selection of accessories and parts
- Assembly and initial setup included
- Relationship-based customer service
The trade-offs typically include slightly higher prices and fewer locations. However, the value of expertise has proven worth the premium in my experience, especially when I needed troubleshooting help.
Online Retailers
Purchasing through Amazon, Northern Tool, or other online retailers offers:
- Potentially lower prices through competitive pricing
- Extensive customer reviews to guide decision-making
- Convenient home delivery
- Wide selection of models, including some not available locally
The main disadvantages are the inability to physically examine the product before purchase, potential shipping damages, and more complicated return processes. I’ve purchased accessories online but prefer buying the main unit locally.
Factory Direct or Refurbished Options
For the budget-conscious, factory direct purchases or refurbished models can provide significant savings. While I haven’t personally gone this route, friends who have report mixed experiences—some found great deals on perfectly functional equipment, while others encountered quality issues.
The key considerations with refurbished models include:
- Shorter warranty periods
- Uncertain usage history
- Potential for early failure
- Limited selection
Spark Plug Replacement: A Simple Maintenance Task with Big Impact
Replacing the spark plug in my Bolens trimmer was one of the first maintenance tasks I learned to perform myself, and it’s made a noticeable difference in starting reliability and performance.
When to Replace Your Spark Plug
I’ve found these signs indicate it’s time for a new spark plug:
- Difficulty starting, especially when the engine is warm
- Rough idling or inconsistent power
- Increased fuel consumption
- Visible damage or heavy deposits on the old plug
- As preventative maintenance at the beginning of each season
Even if none of these symptoms are present, replacing the spark plug annually is cheap insurance against starting problems.
Step-by-Step Replacement Process
Here’s my process for replacing a spark plug:
- Ensure the engine is cool to prevent burns
- Disconnect the spark plug wire by pulling on the boot, not the wire
- Use a spark plug socket (typically 3/4″ or 13/16″) to remove the old plug
- Check the condition of the old plug—fouling may indicate other issues
- Set the gap on the new plug according to specifications (usually 0.025″-0.030″)
- Thread the new plug in by hand to prevent cross-threading
- Tighten with the socket wrench just until snug (over-tightening can damage threads)
- Reconnect the spark plug wire securely
The whole process takes less than 10 minutes but can save hours of frustration from difficult starting or poor performance.
Choosing the Right Spark Plug
I’ve learned that using the manufacturer’s recommended spark plug is crucial. For most Bolens trimmers, this is either a Champion RCJ6Y or NGK BPMR7A or equivalent. Using the wrong heat range or thread size can cause serious engine problems.
When I experimented with a “performance” plug that promised better starting, I actually experienced worse performance. Sticking with the manufacturer’s recommendation has consistently given me the best results.
Edging Capabilities: Turning Your Trimmer Into a Multi-Use Tool
One of the most useful discoveries I made was that my Bolens trimmer could double as an edger with a simple technique adjustment, effectively giving me two tools for the price of one.
Edging Technique
To convert my trimmer to edging mode, I:
- Rotate the trimmer so the cutting head is vertical instead of horizontal
- Position the guard away from the edge being cut
- Use the edge of the trimmer line to create a clean line between lawn and hardscape
- Walk slowly backward, maintaining a consistent depth
- Use short bursts of throttle for precision control
This technique took practice to master, but once I did, I was able to create edges nearly as clean as those made with a dedicated edging tool. The key is maintaining a steady hand and consistent walking pace.
Advantages and Limitations
The benefits of using my Bolens as an edger include:
- One less tool to purchase, store, and maintain
- Quick transitions between trimming and edging
- Sufficient power for most residential edging needs
However, there are limitations:
- Less precise than a dedicated edger with a wheel guide
- More physically demanding as you’re supporting the full weight
- More difficult to maintain consistent depth
- Not ideal for creating new edges, better for maintaining existing ones
For my modest suburban property, the versatility of using one tool for both jobs outweighs the limitations. On particularly tough areas or when creating new edges, I occasionally rent a dedicated edger for a day.
Warranty Coverage: Understanding What’s Protected
When I purchased my Bolens trimmer, I didn’t pay much attention to the warranty until I needed it. Here’s what I learned about Bolens warranty coverage through experience.
Standard Warranty Terms
Most Bolens trimmers come with a 2-year limited warranty for residential use, which covers:
- Defects in materials and workmanship
- Engine components
- Drive system components
- Cutting head components (excluding consumables like trimmer line)
Commercial use typically reduces the warranty period to 90 days, something to consider if you’re using the trimmer for a side business.
What’s Not Covered
Through an unfortunate incident involving my trimmer and a hidden metal fence post, I discovered several exclusions to the warranty:
- Normal wear and tear
- Damage from improper maintenance
- Damage from misuse or accidents
- Consumable parts (line, filters, spark plugs)
- Cosmetic issues that don’t affect performance
- Modifications or alterations to the original design
Making a Warranty Claim
When I did need warranty service for a fuel system issue, I found the process straightforward:
- Locate your proof of purchase (essential for warranty claims)
- Contact the retailer where you purchased the trimmer
- If they can’t help, contact Bolens customer service directly
- Be prepared to provide the model number, serial number, and description of the problem
- Follow their instructions for service or repair
In my case, I was directed to an authorized service center that handled the repair under warranty. The entire process took about two weeks from initial contact to having my repaired trimmer back in hand.
Extended Warranty Considerations
Many retailers offer extended warranty coverage beyond the manufacturer’s 2-year period. I initially declined this option, thinking it unnecessary, but after experiencing a significant repair just after my warranty expired, I’ve reconsidered this position for future purchases.
When evaluating extended warranty offers, I now consider:
- Cost versus likely repair expenses
- Duration of additional coverage
- Whether it covers parts, labor, or both
- Exclusions and limitations
- Reputation of the warranty provider
Bolens vs. The Competition: How Do They Stack Up?
After using my Bolens trimmer for several years and occasionally borrowing or testing friends’ equipment from other brands, I’ve developed some insights into how Bolens compares to its competitors.
Bolens vs. Echo and Stihl
The premium brands like Echo and Stihl generally offer:
- More powerful engines
- Better vibration dampening
- Longer lifespan (7-10+ years with proper maintenance)
- More durable components
- Better parts availability
- Higher price points ($250-400+)
In exchange for these advantages, you’ll pay 50-100% more than a comparable Bolens model. For professionals or those with large properties, this premium may be justified. For my typical suburban usage, the Bolens provides 80-90% of the performance at roughly 60% of the cost.
Bolens vs. Ryobi and Troy-Bilt
In the same general price category as Bolens, brands like Ryobi and Troy-Bilt offer similar value propositions:
- Comparable engine sizes and power
- Similar warranty coverage
- Equivalent feature sets
- Comparable durability
In my experience, the differences between these brands come down to subtle variations in ergonomics, parts availability, and specific features rather than fundamental quality differences. I chose Bolens largely based on local dealer support and a sale price at the time of purchase.
Bolens vs. Battery-Powered Options
The growing category of battery-powered trimmers offers:
- No fuel mixing or starting issues
- Quieter operation
- Lower maintenance requirements
- Zero emissions
- Limited runtime (20-45 minutes typically)
- Less power for tough vegetation
- Higher upfront cost for quality models
For smaller properties with light trimming needs, battery-powered options are increasingly viable alternatives. However, for my mixed landscape with some tough areas, the consistent power and unlimited runtime of my gas-powered Bolens still makes it my preferred choice.
Common Issues and Their Solutions
Every tool has its quirks, and Bolens trimmers are no exception. Here are the most common issues I’ve encountered and how I’ve resolved them.
Starting Difficulties
When my trimmer refuses to start:
- I check for old fuel and replace if necessary
- I clean or replace the spark plug
- I ensure the air filter is clean
- I verify the fuel lines aren’t cracked or disconnected
- I clean the carburetor if needed
Implementing a strict fuel management protocol (fresh fuel, proper mix, stabilizer when stored) has eliminated 90% of my starting problems.
Inconsistent Idle
A trimmer that won’t idle properly or dies when throttle is released is frustrating but usually fixable:
- Dirty carburetor is the most common cause—cleaning solves most cases
- Clogged air filter can cause erratic performance
- Fuel filter may be partially blocked
- Carburetor adjustment may be needed (typically requires a special tool)
I’ve found that regular maintenance prevents most idle problems before they start.
Overheating
If my trimmer gets uncomfortably hot or loses power during extended use:
- I check for debris blocking cooling fins
- I verify the spark arrestor screen isn’t clogged
- I avoid running at full throttle continuously
- I give the engine a cool-down break every 20-30 minutes
Proper cooling is essential for engine longevity, so I’m diligent about keeping air paths clear.
Line Feeding Problems
When the trimmer line won’t advance properly:
- I check for tangled line in the spool
- I verify the line isn’t welded together from heat
- I clean debris from the trimmer head
- I ensure the bump knob isn’t damaged
- I replace the entire head if internal components are worn
After much frustration, I’ve found that quality trimmer line and proper winding technique prevent most feeding issues.
Excessive Vibration
Increased vibration can indicate:
- Bent shaft or spindle
- Damaged cutting head
- Loose engine mounts
- Worn bearings
- Improperly balanced cutting attachment
Addressing vibration promptly prevents it from causing additional damage to the trimmer and reduces operator fatigue.
Heavy-Duty Performance: Can Bolens Handle Tough Jobs?
When I first purchased my Bolens trimmer, I wondered if it would be up to tackling the wild areas at the back of my property. After putting it through numerous challenging situations, I have a clear picture of its capabilities and limitations.
Defining “Heavy-Duty”
In my experience, heavy-duty trimming includes:
- Cutting thick, woody weeds and brush
- Clearing areas that haven’t been maintained for a season or longer
- Extended operation (1+ hours continuously)
- Tackling dense, wet vegetation
- Operating in challenging conditions like slopes or rough terrain
Bolens Performance in Challenging Conditions
My mid-range Bolens (29cc model) has performed admirably in most heavy-duty situations I’ve encountered:
- It handles thick weeds and light brush with appropriate line (.095″ twisted)
- It maintains adequate power for 45-60 minutes of continuous operation
- It can clear neglected areas with multiple passes
- It manages wet vegetation, though with reduced efficiency
However, I’ve found limitations when:
- Attempting to cut woody stems thicker than 1/2 inch
- Running continuously for more than an hour in hot weather
- Tackling extremely dense invasive species like Japanese knotweed
For these extreme challenges, higher-powered professional equipment or specialized brush cutters would be more appropriate.
Maximizing Heavy-Duty Performance
To get the most from my Bolens in tough conditions, I’ve learned to:
- Use the appropriate line type and thickness for the job
- Take multiple passes on extremely overgrown areas
- Allow cooling breaks every 30 minutes during extended use
- Keep the air filter and cooling system especially clean
- Maintain sharp cutting edges on bladed attachments
- Use full throttle only when necessary to conserve fuel and reduce strain
With these approaches, my mid-range Bolens has successfully tackled 95% of the challenges I’ve thrown at it over the years.
Trimmer Line Selection: More Important Than You Think
The type and quality of line used in a trimmer has a surprisingly significant impact on performance, efficiency, and user experience. Through much experimentation, I’ve developed strong preferences based on real-world results.
Line Diameter Considerations
Bolens trimmers are typically designed to accommodate:
- .080″ line for light-duty trimming (grass, light weeds)
- .095″ line for medium-duty work (thicker weeds, regular maintenance)
- .105″ line for heavier applications (if the trimmer model supports it)
I’ve found that using the heaviest line your model can effectively handle provides the best balance of durability and cutting efficiency. However, heavier line requires more engine power and can reduce battery life on cordless models.
Line Shapes and Their Applications
The shape of the trimmer line affects its cutting ability and durability:
- Round line is the standard, offering decent all-around performance
- Twisted line provides better cutting with less fraying
- Square or multi-sided line offers more cutting edges for efficient work
- Serrated or toothed lines provide aggressive cutting for tough vegetation
After trying various options, I’ve settled on twisted line for most applications, switching to serrated only for the toughest areas of my yard.
Material Quality Differences
Not all trimmer line is created equal. Through trial and error, I’ve found:
- Basic nylon line works for light duty but wears quickly
- Copolymer lines offer improved durability at moderate cost
- Premium lines with additives resist welding and breaking
- Commercial-grade lines with reinforced cores last longest but cost more
The few extra dollars for premium line has proven to be an excellent investment, reducing the frequency of rewinding and providing more consistent performance.
Line Color Significance
The color of trimmer line isn’t just cosmetic:
- High-visibility colors (orange, yellow) make it easier to see where you’re cutting
- Some colors indicate specific materials or construction techniques
- Certain colors may be designed for specific applications (commercial vs. residential)
I prefer bright orange or yellow line for better visibility, especially when working in areas with mixed vegetation where seeing the cutting path clearly is important.
Bolens Trimmers for Large Properties: Up to the Task?
When I purchased my home on a larger lot (just over an acre), I wondered if my trusty Bolens trimmer from my previous property would be sufficient or if I’d need to upgrade to a commercial-grade tool.
Acreage Considerations
For larger properties, several factors become more important:
- Runtime on a single tank becomes critical
- Ergonomics matter more due to extended use
- Durability under extended operation is essential
- Cutting width efficiency saves significant time
- Power reserve for occasional tough spots is valuable
My experience using a Bolens on a larger property has been largely positive with some caveats.
Fuel Efficiency and Runtime
On my larger property, I found:
- A full tank on my 29cc Bolens lasts approximately 45-60 minutes of mixed-use trimming
- This is sufficient to complete about 1/2 to 3/4 acre of typical trimming
- For my full property, I need to refuel once during a complete trimming session
- The quick refueling process (2-3 minutes) isn’t a significant inconvenience
While commercial trimmers often have larger tanks, the difference hasn’t justified an upgrade for my needs.
Time Requirements
Time efficiency becomes more critical as property size increases:
- My Bolens with a 17″ cutting width takes approximately 1.5-2 hours to trim my entire acre
- A commercial trimmer with wider cutting capability might reduce this by 15-20%
- The biggest time savings comes from technique and familiarity rather than equipment
For weekly maintenance trimming, my Bolens completes the job in a reasonable timeframe. For properties significantly larger than an acre, the time savings of a wider commercial trimmer might justify the additional investment.
Comfort During Extended Use
Where I’ve found the biggest limitation for larger properties is operator comfort:
- The standard harness becomes inadequate after 60+ minutes
- Hand and arm fatigue becomes noticeable after extended use
- The vibration, while moderate, accumulates over longer sessions
I’ve addressed these issues by:
- Upgrading to a padded aftermarket harness
- Taking strategic breaks every 30-45 minutes
- Wearing vibration-reducing gloves
- Adjusting my grip and stance frequently
With these adaptations, my Bolens has proven adequate for my larger property, though I can see why professionals opt for higher-end equipment designed for all-day use.
Air Filter Maintenance: The Most Overlooked Service Item
Of all the maintenance tasks I perform on my Bolens trimmer, properly caring for the air filter has provided the most noticeable performance improvement with the least effort.
Recognizing When Service Is Needed
I check my air filter when:
- The engine seems to lack power
- Fuel consumption increases
- Starting becomes more difficult
- I notice visible dirt or debris on the filter
- I’ve used the trimmer for 8-10 hours (regardless of condition)
Even if the filter looks relatively clean, fine dust particles can restrict airflow and affect performance.
Cleaning Process
My air filter cleaning routine includes:
- Locating the air filter cover (typically secured by a screw or clip)
- Carefully removing the cover without dropping debris into the carburetor
- Removing the filter element
- Gently tapping it to remove loose debris
- For foam filters:
- Washing in warm soapy water
- Rinsing thoroughly
- Allowing to dry completely
- Applying a small amount of clean engine oil and squeezing out excess
- For paper filters:
- Blowing from the inside out with compressed air (if not too dirty)
- Replacing if significantly dirty (they cannot be effectively washed)
- Cleaning the inside of the air filter housing
- Reinstalling the filter and cover securely
This entire process takes less than 10 minutes but makes a remarkable difference in performance.
Replacement Intervals
Through experience, I’ve established these guidelines:
- Clean the filter every 8-10 hours of operation
- Replace foam filters every season or after 25-30 hours
- Replace paper filters if they show any signs of deterioration
- Keep a spare filter on hand for immediate replacement when needed
The minimal cost of replacement filters (typically $5-15) compared to the potential damage from running with a clogged filter makes this an easy decision.
Attachment Compatibility: Expanding Your Trimmer’s Capabilities
One of the features I initially overlooked but later came to appreciate was my Bolens trimmer’s compatibility with various attachments, effectively transforming it into a multi-tool system.
Available Attachments
Depending on your Bolens model, these attachments may be compatible:
- Edger attachment for clean lawn boundaries
- Brush cutter for heavier vegetation
- Blower for clearing debris
- Cultivator for light garden tilling
- Pole saw for reaching high branches
- Hedge trimmer for shaping bushes
Not all Bolens models accept attachments, so it’s important to verify compatibility before purchasing. My mid-range straight-shaft model supports the full range of attachments, while the entry-level curved shaft model has limited compatibility.
Attachment System Design
The attachment system on compatible Bolens trimmers uses a quick-connect coupler that allows for tool-free changes:
- Loosen the knob or lever on the coupler
- Press the release button
- Pull the shaft sections apart
- Insert the desired attachment until it clicks
- Tighten the coupler knob or lever
The entire process takes less than a minute once you’re familiar with it.
Cost-Benefit Analysis
Adding attachments involves additional investment:
- Individual attachments range from $50-120 each
- Complete sets are sometimes available at a discount
- Storage space for multiple attachments is required
- Each attachment adds maintenance requirements
However, compared to purchasing separate dedicated tools:
- The attachment system saves 40-60% on total cost
- Storage space requirements are significantly reduced
- You only need to maintain one power head
- Fuel and starting procedures are consistent across tools
For my needs, purchasing the edger and brush cutter attachments has provided excellent value, while I found the blower attachment underpowered for my preferences and opted for a dedicated tool instead.
Customer Experiences: What Others Are Saying
While my personal experience with Bolens trimmers has been largely positive, I’ve also researched other users’ experiences to provide a more complete picture.
Positive Feedback Patterns
Common praise from Bolens users includes:
- Excellent value for the price point
- Reliable starting (when properly maintained)
- Good power-to-weight ratio
- Sufficient cutting capability for typical homeowner needs
- Reasonable durability for the cost
- Straightforward maintenance requirements
These align with my experiences and reinforce that Bolens occupies a solid position in the mid-range trimmer market.
Common Criticisms
Recurring complaints about Bolens trimmers include:
- Line feeding issues with the stock trimmer head
- Carburetor adjustment difficulties
- Limited parts availability in some regions
- Shorter lifespan compared to premium brands
- Vibration levels higher than more expensive models
- Plastic components that can break under heavy use
I’ve experienced some of these issues myself, particularly with the stock trimmer head, which I eventually replaced with an aftermarket version that has performed much better.
The Consensus View
Taking all feedback into account, the general consensus seems to be:
- Bolens trimmers provide good value for homeowners with typical needs
- They represent a sweet spot between budget models that lack durability and premium models that exceed most homeowners’ requirements
- With proper maintenance, they deliver reliable service for 4-7 years
- They’re best suited for properties under 1 acre with moderate trimming needs
This matches my assessment that Bolens trimmers occupy a solid middle ground in the market—not the cheapest or the most premium, but offering reasonable quality at an accessible price point.
Final Thoughts: Is a Bolens Trimmer Right for You?
After four years of using my Bolens trimmer through every imaginable lawn care scenario, countless maintenance sessions, and a few repairs, I’ve developed a clear perspective on who would benefit most from this brand.
Ideal User Profile
A Bolens trimmer is likely an excellent match if you:
- Own a small to medium-sized property (up to an acre)
- Have typical residential trimming needs
- Value reasonable quality at an accessible price point
- Are willing to perform basic maintenance
- Don’t require commercial-grade durability
- Appreciate a balance of performance and affordability
For these users, a Bolens trimmer represents a smart investment that will provide years of reliable service without breaking the bank.
When to Consider Alternatives
You might want to look at other options if you:
- Have a larger property with extensive trimming requirements
- Need to tackle very thick brush or woody vegetation regularly
- Require all-day operation without fatigue
- Prioritize maximum durability over initial cost
- Prefer minimal maintenance requirements
- Value premium features like advanced anti-vibration systems
In these cases, investing in a higher-end brand might better serve your needs despite the higher initial cost.
The Value of Personal Experience
What I’ve learned most clearly through my journey with my Bolens trimmer is that the right tool depends more on how you use it than on brand prestige or specifications alone. Understanding your specific needs, maintaining your equipment properly, and developing good technique will ultimately determine your satisfaction more than the logo on the engine cover.
My Bolens has taught me that with proper care, even mid-range tools can deliver excellent results. It’s been a reliable partner in transforming my outdoor space from an overgrown challenge to a point of pride—and that’s the true measure of any tool’s value.
