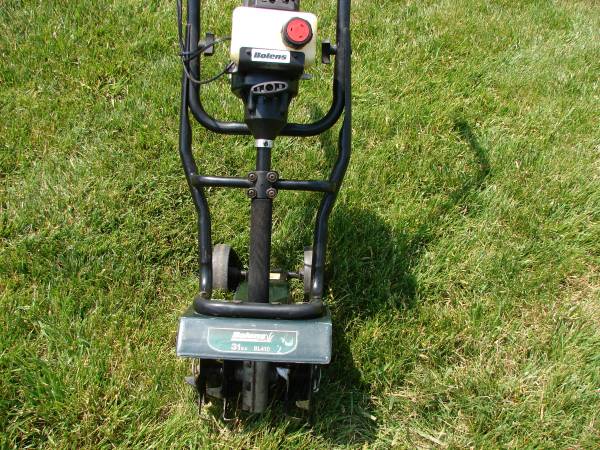

Bolens 31-cc 2-cycle 10-in Forward-rotating Gas Cultivator
- SpringAssist Starting System dramatically reduces pulling effort
- Adjust tilling width to match your job; smaller width is perfect for weeding between rows of vegetables and in between landscaping
- Steel tines can cut into various types of soil with minimal effort
- Forward rotating tines are engineered to dig, cut roots and disc the soil
$25.99
When I first laid eyes on the Bolens 31Cc Cultivator sitting in my neighbor’s shed, I had no idea that this compact machine would completely transform my gardening experience. After borrowing it for a weekend and seeing how efficiently it turned my rock-hard soil into a fluffy, plantable paradise, I knew I needed one of my own. Fast forward three growing seasons, and I’ve become somewhat of a cultivator evangelist in my neighborhood. If you’re considering adding this tool to your garden arsenal or just need help with your existing model, buckle up – I’m about to share everything I’ve learned about the Bolens 31Cc Cultivator.
Why I Chose the Bolens 31Cc Cultivator
Before diving into the technical details, let me tell you why I fell in love with this particular model. As someone with a medium-sized garden and not a lot of storage space, I needed something powerful yet compact. At just under 24 pounds, the Bolens strikes that perfect balance between lightweight maneuverability and serious digging power.
The 31cc two-cycle engine delivers impressive performance for its size, turning even my clay-heavy soil into workable ground without the back-breaking labor of manual tilling. When my gardening friends see what this little machine can do, their jaws drop – especially when they realize it costs significantly less than larger tillers.
Unboxing and Assembly: Easier Than You Might Think
I still remember the excitement of my cultivator arriving. The box was surprisingly compact, which immediately eased my storage concerns. Opening it revealed neatly packaged components that initially looked intimidating, but the included instruction manual made assembly straightforward.
To assemble your Bolens 31Cc Cultivator, you’ll need to:
- Attach the handlebar assembly to the main unit using the provided bolts
- Connect the throttle cable to the engine
- Install the tines (they come pre-assembled in sets)
- Attach the drag stake if you’ll be using it for deeper tilling
The entire process took me about 30 minutes, and I’m far from mechanically inclined. The only tool I needed was a wrench to tighten the bolts securing the handlebar. Everything else clicked into place with satisfying precision.
One tip I wish I’d known earlier: take a photo of the tine assembly before you ever need to remove them for cleaning or replacement. This will save you some head-scratching later when you need to put everything back together.
Fueling Up: Getting the Mix Right
One of the most common questions I get from friends who borrow my cultivator is about the fuel. The Bolens 31Cc Cultivator uses a fuel-oil mixture since it’s a two-cycle engine. Getting this mixture right is crucial for proper operation and longevity of your machine.
The correct fuel-to-oil ratio is 40:1, which means 40 parts unleaded gasoline to 1 part two-cycle engine oil. In practical terms, this works out to about 3.2 ounces of oil per gallon of gas. I use a small, dedicated gas can for my cultivator with measurements marked on the side to ensure I’m always getting the ratio correct.
Some important fuel tips I’ve learned:
- Always use fresh, unleaded gasoline with an octane rating of 87 or higher
- Never use E15 or E85 gasoline, as the ethanol content can damage small engines
- Use only two-cycle engine oil specifically formulated for air-cooled engines
- Mix the fuel thoroughly by gently shaking the container
- The fuel tank holds approximately 20 ounces, which gives me about 45-60 minutes of runtime
I’ve found it helpful to mix smaller batches rather than a full gallon at once, as the fuel mixture doesn’t store well long-term. If you won’t be using your cultivator for more than 30 days, it’s best to drain the tank completely.
Starting Your Cultivator: A Step-by-Step Guide
The first time I tried to start my Bolens, I pulled the starter cord until my arm felt like it might fall off. After consulting the manual (which I should have done first), I realized I was missing some key steps. Here’s the proper starting procedure I’ve found works every time:
- Place the cultivator on level ground
- Press the primer bulb 5-7 times until you see fuel in the clear return line
- Move the choke lever to the FULL position (closed)
- Set the ON/OFF switch to the ON position
- Hold the unit firmly with one hand on the handle
- Pull the starter cord with a smooth, controlled motion 3-5 times until the engine attempts to start
- Once the engine attempts to start, move the choke to HALF position
- Pull the starter cord again until the engine starts completely
- Allow the engine to warm up for 30-60 seconds
- Move the choke to the RUN position (open)
- Squeeze the throttle to begin tilling
If your cultivator doesn’t start after several attempts, check that:
- The fuel tank has fresh fuel mixture
- The spark plug is clean and properly gapped
- The air filter isn’t clogged
- The fuel filter isn’t blocked
Once I mastered this starting sequence, getting my cultivator running became second nature. On cold mornings, I’ve found that an extra prime or two helps, but be careful not to flood the engine by over-priming.
Tilling Performance: What to Expect
The Bolens 31Cc Cultivator features a tilling width of 8-10 inches, depending on how you position the tines. This might sound narrow compared to larger tillers, but I’ve found it perfect for working between rows, around established plants, and in tight spaces where a bigger machine simply wouldn’t fit.
The tilling depth is adjustable via the drag stake at the rear of the machine. At its deepest setting, I’ve been able to till about 5 inches down, which is sufficient for most garden bed preparation and maintenance. For virgin ground or extremely compacted soil, you may need multiple passes to reach your desired depth.
One of the most common questions I get is whether this cultivator can handle rocky soil. The answer is yes, with some caveats. The Bolens can manage small rocks and light gravel, but I wouldn’t recommend it for heavily rocky areas. I learned this the hard way when I tried to till a new bed in a particularly rocky section of my yard. The cultivator kept bouncing around, and I ended up having to replace a bent tine afterward.
For best results, I recommend:
- Working in slightly damp (not wet) soil
- Making multiple shallow passes rather than trying to dig deep immediately
- Going slowly to allow the tines to properly break up the soil
- Removing any large rocks or debris before tilling
Maintenance: Keeping Your Cultivator Running Smoothly
After three seasons of regular use, I can confidently say that proper maintenance is the key to keeping your Bolens 31Cc Cultivator running like new. Fortunately, the maintenance requirements are straightforward and don’t require advanced mechanical knowledge.
Regular Cleaning
After each use, I take a few minutes to clean my cultivator thoroughly:
- Allow the engine to cool completely
- Remove any debris, soil, or plant material from the tines and guards
- Use a stiff brush to clean hard-to-reach areas
- Wipe down the entire unit with a damp cloth
- Check for any loose bolts or worn parts
I’ve found that compressed air (if you have access to it) works wonders for blowing out soil from tight spaces around the engine and tines. For stubborn clay or mud, a garden hose with gentle pressure can help – just be careful not to spray water directly into the air filter or carburetor areas.
Seasonal Maintenance
Beyond regular cleaning, I perform these maintenance tasks at the beginning and end of each growing season:
- Air Filter Maintenance: Remove and clean the air filter (or replace if damaged). A clean air filter is crucial for proper engine performance.
- Spark Plug Inspection: Remove the spark plug, check for carbon buildup, and clean or replace as needed. The proper gap for the spark plug should be 0.025 inches.
- Tine Inspection: Check the tines for wear, bending, or damage. Replace any damaged tines to ensure efficient tilling.
- Lubrication: Apply a lightweight oil to all moving parts, including the throttle cable and tine shaft.
- Fuel System Check: Inspect fuel lines for cracks or leaks and replace if necessary.
Replacing the spark plug every season has proven to be excellent preventative maintenance. It’s an inexpensive part (usually under $10) that makes a big difference in starting reliability and performance.
Troubleshooting Common Issues
Even with proper maintenance, you might occasionally encounter issues with your cultivator. Here are the most common problems I’ve faced and how I solved them:
Engine Won’t Start
When my cultivator refused to start last spring, I went through this checklist:
- Check the fuel: Ensure you have fresh fuel with the proper 40:1 mix ratio.
- Inspect the spark plug: Remove it and check for fouling or damage.
- Examine the air filter: A clogged air filter prevents proper airflow.
- Verify the ON/OFF switch: Make sure it’s in the ON position (sounds obvious, but I’ve made this mistake!).
- Check for flooded engine: If you smell strong fuel odor, the engine might be flooded. Wait 15 minutes before trying again.
In my case, the culprit was old fuel left in the tank over winter. After draining it and adding fresh fuel mixture, the engine started right up.
Engine Starts But Dies Quickly
This happened to me during a particularly hot day last summer:
- Choke position: Make sure the choke is fully open after the engine warms up.
- Fuel cap vent: Check that the vent in the fuel cap isn’t clogged.
- Fuel filter: A clogged fuel filter can restrict flow to the engine.
- Carburetor adjustment: This might require professional service if the above steps don’t work.
Tines Not Turning Properly
When I noticed my tines weren’t spinning with their usual vigor:
- Check for debris: Remove any vines, roots, or string wrapped around the tine shaft.
- Inspect the drive system: Look for damaged or worn components.
- Verify tine installation: Ensure tines are installed correctly and securely.
Excessive Vibration
Excessive vibration can make the cultivator difficult to control:
- Check for bent tines: Even slightly bent tines can cause significant vibration.
- Inspect the engine mounts: Look for loose or damaged mounts.
- Balance check: Ensure the tine assemblies are balanced and installed symmetrically.
Replacing Worn Parts
Eventually, certain parts will need replacement due to normal wear and tear. Here’s what I’ve had to replace so far:
Replacing Tines
After about two seasons of regular use, I needed to replace my tines due to wear. The process was simpler than I expected:
- Remove the cotter pins securing the tines to the shaft
- Slide the old tines off the shaft
- Clean the shaft thoroughly
- Install the new tines in the same configuration as the originals
- Replace the cotter pins with new ones
A complete set of replacement tines costs around $25-35, depending on where you purchase them. I’ve found that genuine Bolens parts last longer than generic alternatives, though they cost slightly more.
Spark Plug Replacement
Replacing the spark plug is a five-minute job that makes a huge difference in performance:
- Remove the spark plug wire
- Use a spark plug socket to remove the old plug
- Gap the new plug to 0.025 inches using a feeler gauge
- Install the new plug, being careful not to overtighten
- Reconnect the spark plug wire
Air Filter Replacement
A clean air filter is essential for proper engine function:
- Remove the air filter cover (usually secured by a single screw)
- Take out the old filter
- Clean the filter housing
- Install the new filter
- Replace the cover
I’ve found that cleaning the foam air filter with warm, soapy water can extend its life, but replacement is necessary when it begins to deteriorate.
Off-Season Storage: Protecting Your Investment
Proper storage during the off-season is crucial for ensuring your cultivator starts readily when spring arrives. Here’s my end-of-season routine:
- Fuel System Preparation: Either drain the fuel tank completely or add fuel stabilizer to fresh fuel and run the engine for a few minutes to distribute it through the system.
- Engine Protection: Remove the spark plug, put a teaspoon of two-cycle oil into the cylinder, pull the starter cord slowly a few times to distribute the oil, then reinstall the spark plug.
- Exterior Protection: Clean the entire unit thoroughly and apply a light coat of oil to metal parts to prevent rust.
- Storage Position: Store the cultivator upright in a dry, covered area away from fertilizers or chemicals that could cause corrosion.
- Cover: Use a breathable cover to keep dust off while allowing any moisture to escape.
I store mine in my garden shed on a small wooden platform to keep it off the concrete floor, which helps prevent moisture damage to the underside of the machine.
Safety First: Operating Your Cultivator Responsibly
The most important aspect of using any power equipment is safety. After a close call when a rock was thrown toward my leg, I’ve become vigilant about these safety practices:
- Wear Proper Gear: Always wear closed-toe shoes (preferably steel-toed boots), long pants, safety glasses, hearing protection, and gloves.
- Inspect the Area: Before tilling, remove rocks, sticks, wire, or other debris that could become dangerous projectiles.
- Check for Utilities: Know where underground utilities are located before tilling a new area.
- Maintain Stability: Always maintain solid footing and proper balance while operating the cultivator.
- Keep Others Away: Maintain a safe distance (at least 50 feet) between the cultivator and other people or pets.
- Avoid Wet Conditions: Never operate the cultivator in wet or slippery conditions.
- Stay Alert: Never operate the cultivator when tired, ill, or under the influence of alcohol or medications.
- Proper Handling: Always use both hands to control the cultivator and never leave it running unattended.
- Shutdown Safety: Turn off the engine and disconnect the spark plug wire before performing any maintenance.
- Cooling Period: Allow the engine to cool completely before refueling or storing.
I once made the mistake of wearing sandals while “just quickly” tilling a small area. A small rock flew up and gave me a painful reminder of why proper footwear is non-negotiable.
Is the Bolens 31Cc Cultivator Right for Your Garden?
After three seasons with my Bolens, I feel qualified to advise on whether this cultivator might be the right choice for your needs.
Ideal For:
- Small to medium gardens (up to about 2,000 square feet)
- Maintenance tilling between rows and around established plants
- Gardeners with limited storage space
- Those who need maneuverability in tight spaces
- Budget-conscious gardeners who still want quality performance
- First-time tiller owners
- Elderly or smaller-framed gardeners who might struggle with larger equipment
Not Ideal For:
- Breaking new ground on large areas
- Very rocky or root-filled soil
- Clay-heavy soil that requires deep tilling
- Commercial or daily use
- Gardens larger than 2,000 square feet (would be too time-consuming)
In my experience, the Bolens 31Cc Cultivator excels at maintaining established garden beds and creating new small to medium-sized planting areas. It strikes an excellent balance between power and portability that makes it perfect for the average home gardener.
Finding Replacement Parts and Accessories
When I needed to replace my tines last year, I discovered several reliable sources for Bolens parts:
- Authorized Dealers: Local lawn and garden centers that sell Bolens equipment often stock common replacement parts.
- Online Retailers: Websites like Amazon, eBay, and specialized lawn equipment parts stores carry most Bolens components.
- Manufacturer Direct: MTD Products (the parent company of Bolens) offers parts through their website.
- Universal Parts: For items like spark plugs, air filters, and fuel lines, universal parts often work perfectly and can be more readily available.
I recommend keeping these common replacement items on hand:
- Spark plug
- Air filter
- Fuel filter
- Extra cotter pins for the tines
- Fuel line (sold by the foot at most auto parts stores)
Having these parts available has saved me frustration more than once when I’ve been in the middle of a project and encountered an issue.
The Warranty: What You Should Know
The Bolens 31Cc Cultivator typically comes with a 2-year limited warranty for residential use. This covers defects in materials and workmanship, but not normal wear and tear or damage from improper maintenance.
To ensure your warranty remains valid:
- Register your product promptly after purchase
- Keep your receipt and warranty information in a safe place
- Follow all maintenance procedures outlined in the manual
- Use only recommended fuel, oil, and replacement parts
- Document any service performed on your cultivator
When I had an issue with my throttle cable during the warranty period, having my registration and receipt information readily available made the warranty claim process much smoother.
My Personal Experience: Three Seasons with the Bolens
Looking back on three seasons with my Bolens cultivator, I can honestly say it’s been one of my best garden investments. I’ve used it to create new beds, maintain existing ones, mix compost into my soil, and even help neighbors with their gardens.
The first season, I was just learning the ropes and made some mistakes – like forgetting to clean the tines thoroughly after use, which led to some rust issues. By season two, I had developed a routine and was getting the most out of my machine. Now in season three, I feel like the cultivator is an extension of my gardening self, and I can’t imagine doing without it.
What I love most is how it’s transformed difficult gardening tasks into manageable ones. Before the cultivator, turning over my garden beds was a multi-day affair that left me with sore muscles and blisters. Now I can refresh an entire bed in less than an hour, with energy left for planting.
Final Thoughts: Is It Worth The Investment?
At around $200-$250 depending on where you purchase it, the Bolens 31Cc Cultivator represents a significant investment for many home gardeners. After three years of use, my verdict is an emphatic yes – it’s worth every penny.
The time and physical strain it saves, the improved soil quality it helps create, and the expanded gardening possibilities it offers have paid for the machine many times over. Just the difference in my vegetable yields from better-prepared soil has offset the cost.
If you’re on the fence about purchasing a cultivator, consider how much time you currently spend on manual tilling and how much more gardening you could do if that time were freed up. For me, the answer was clear – the Bolens has allowed me to expand my garden and enjoy the process more fully.
Whether you’re a seasoned gardener looking to reduce physical strain or a beginner hoping to create your first garden beds, the Bolens 31Cc Cultivator offers reliable performance in a manageable package. Just remember to respect its power, maintain it properly, and store it correctly during the off-season, and it will serve you well for many growing seasons to come.
Happy tilling!
